Difference between revisions of "EE:Exile's Path"
Johnmyster (Talk | contribs) (Created page with "{{EE}} Like all wiki pages, '''SPOILERS ALERT'''!<onlyinclude>{{ {{{tpl|DungeonInfobox}}} |DungeonName=Exile's Path |Region=Extreme South |Rumor=''Although this underground pa...") |
Johnmyster (Talk | contribs) m (→Strategy) |
||
| Line 47: | Line 47: | ||
== Strategy == | == Strategy == | ||
| − | This dungeon brings back the absolutely '''awful monster pool''' from [[Shadow Bog]] and swaps {{EEM|Muck | + | This dungeon brings back the absolutely '''awful monster pool''' from [[Shadow Bog]] and swaps {{EEM|Muck Walker}}s for {{EEM|Siabrae}} - that might sound better, but in such a small dungeon spawning random plants can be quite problematic. |
You'll need to reach AT LEAST '''level 9''' here, so you have to play fairly efficiently - this is hard because every monster here feels like a terrible target - you'll need to figure out which one is the least harmful for you. {{EEM|Swamp Worm}}s are actually a blessing here - they drown you in {{t|Corrosion}}, but they have much weaker stats than anything else so they make great high level targets. Suboptimal popcorn, though. {{EEM|Beholder}}s also aren't too bad if you are in a position where {{t|Mana Burn}} won't be a problem. {{EEM|Pestilent Bloat}}s are quite easy if you don't mind {{t|Cursed}}, but they will make you use a lot of blackspace if you're not careful from bleeding. Siabrae are fine but you don't want to hit them too much, so maybe avoid fighting high level ones. {{EEM|Goblin Trapper}}s are actually quite bad ([[Image:Ensnare.png|20px|link=]][[EE:Traits#Ensnare | Ensnare]] is much worse than it seems, makes it very hard to fight higher level enemies). The only monster I really recommend not fighting if you can avoid it is {{EEM|Rusted Guardian}}s - {{t|Weakening blow}} is awful and they are very hard to kill. {{s|IMAWAL}} is a great spell here for petrifying them. | You'll need to reach AT LEAST '''level 9''' here, so you have to play fairly efficiently - this is hard because every monster here feels like a terrible target - you'll need to figure out which one is the least harmful for you. {{EEM|Swamp Worm}}s are actually a blessing here - they drown you in {{t|Corrosion}}, but they have much weaker stats than anything else so they make great high level targets. Suboptimal popcorn, though. {{EEM|Beholder}}s also aren't too bad if you are in a position where {{t|Mana Burn}} won't be a problem. {{EEM|Pestilent Bloat}}s are quite easy if you don't mind {{t|Cursed}}, but they will make you use a lot of blackspace if you're not careful from bleeding. Siabrae are fine but you don't want to hit them too much, so maybe avoid fighting high level ones. {{EEM|Goblin Trapper}}s are actually quite bad ([[Image:Ensnare.png|20px|link=]][[EE:Traits#Ensnare | Ensnare]] is much worse than it seems, makes it very hard to fight higher level enemies). The only monster I really recommend not fighting if you can avoid it is {{EEM|Rusted Guardian}}s - {{t|Weakening blow}} is awful and they are very hard to kill. {{s|IMAWAL}} is a great spell here for petrifying them. | ||
Revision as of 23:46, 24 June 2023
| This feature is part of the Extreme Edition fan-made expansion. |
Like all wiki pages, SPOILERS ALERT!
| Although this underground path was safe when Kingdom's founders first crossed it, the once empty trail has filled with monsters. Many have attempted a repeat crossing, but all have returned unsuccessfully in an anomalous sort of despair. | |
| Exile's Path | |
|---|---|
| Region | Extreme South |
| Difficulty | Vicious |
| Monster Stats | 140% |
| Population | |
| Bosses | 4 Optional Shadow Bosses and The Dark Beneath |
| Suggested Classes | |
| Quests | Magical Material Tour, pt. 1 |
| Unlock | Complete Groundbreaking Discovery in Shadow Bog |
Although this underground path was safe when Kingdom's founders first crossed it, the once empty trail has filled with monsters. Many have attempted a repeat crossing, but all have returned unsuccessfully in an anomalous sort of despair.
Contents
Special Rules
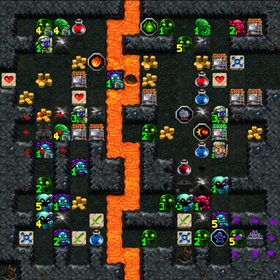
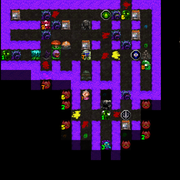
The map here is significantly smaller than usual - 18x18 (19% smaller) and is divided by a lava river with only one crossing point. When you reach level 5, you are transported to a nightmare realm - the dungeon gets scrambled, all walls are made impenetrable, the entire dungeon is reshrouded, all remaining shops are replaced with random other shops, and if you used the potion shop it is restocked. There is a new locked subdungeon in the nightmare realm.
As you level up after this point, some plants with ![]() Serrated Strike,
Serrated Strike, ![]() Death-gaze 50% and
Death-gaze 50% and ![]() Magic Immune will spawn on the map.
Magic Immune will spawn on the map.
When you reach level 6, around 10 stacks of ![]() Ensnare and 4-5 stacks of
Ensnare and 4-5 stacks of ![]() Cursed get put on you. Once you reach level 8, you get poisoned, mana burned, and 5 stacks each of weakening and corrosion. Once you reach level 9, the locked subdungeon becomes unlocked - beware that when you enter, you won't be able to leave again!
Cursed get put on you. Once you reach level 8, you get poisoned, mana burned, and 5 stacks each of weakening and corrosion. Once you reach level 9, the locked subdungeon becomes unlocked - beware that when you enter, you won't be able to leave again!
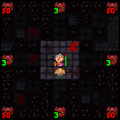
This subdungeon brings you to a shadow pit, a 9x9 fully shrouded dungeon. In the four cardinal directions, there are four level 3 Shadow Tendrils. In the center, the altar of whatever god you are worshiping comes with you. In the four diagonal ends, there are the four optional bosses (in a random order). Once you kill one of the bosses, the subdungeon is totally reset - You are placed back in the center, the dungeon is reshrouded, all remaining bosses are restored to full health and cured of debuffs (but kept in the same location), and the tendrils respawn. In the place of whatever boss you killed, there is now The Dark Beneath. This happens each time you kill a boss, but the bosses don't respawn, so you can do it at most 4 times. The Dark Beneath does not regain health when the dungeon is reset, so you can use the blackspace restoration to slowly whittle down the boss.
Strategy
This dungeon brings back the absolutely awful monster pool from Shadow Bog and swaps ![]() Muck Walkers for
Muck Walkers for ![]() Siabrae - that might sound better, but in such a small dungeon spawning random plants can be quite problematic.
Siabrae - that might sound better, but in such a small dungeon spawning random plants can be quite problematic.
You'll need to reach AT LEAST level 9 here, so you have to play fairly efficiently - this is hard because every monster here feels like a terrible target - you'll need to figure out which one is the least harmful for you. ![]() Swamp Worms are actually a blessing here - they drown you in
Swamp Worms are actually a blessing here - they drown you in ![]() Corrosion, but they have much weaker stats than anything else so they make great high level targets. Suboptimal popcorn, though.
Corrosion, but they have much weaker stats than anything else so they make great high level targets. Suboptimal popcorn, though. ![]() Beholders also aren't too bad if you are in a position where
Beholders also aren't too bad if you are in a position where ![]() Mana Burn won't be a problem.
Mana Burn won't be a problem. ![]() Pestilent Bloats are quite easy if you don't mind
Pestilent Bloats are quite easy if you don't mind ![]() Cursed, but they will make you use a lot of blackspace if you're not careful from bleeding. Siabrae are fine but you don't want to hit them too much, so maybe avoid fighting high level ones.
Cursed, but they will make you use a lot of blackspace if you're not careful from bleeding. Siabrae are fine but you don't want to hit them too much, so maybe avoid fighting high level ones. ![]() Goblin Trappers are actually quite bad (
Goblin Trappers are actually quite bad (![]() Ensnare is much worse than it seems, makes it very hard to fight higher level enemies). The only monster I really recommend not fighting if you can avoid it is
Ensnare is much worse than it seems, makes it very hard to fight higher level enemies). The only monster I really recommend not fighting if you can avoid it is ![]() Rusted Guardians -
Rusted Guardians - ![]() Weakening blow is awful and they are very hard to kill.
Weakening blow is awful and they are very hard to kill. ![]() IMAWAL is a great spell here for petrifying them.
IMAWAL is a great spell here for petrifying them.
Before reaching level 5, you probably want to buy a ![]() Burn Salve from the potion shop. If you have a lot of them, Swamp Worms aren't a problem at all and the final phase gets a lot easier - plus it will help you deal with the afflictions you get at level 8. Speaking of that, you will also want a
Burn Salve from the potion shop. If you have a lot of them, Swamp Worms aren't a problem at all and the final phase gets a lot easier - plus it will help you deal with the afflictions you get at level 8. Speaking of that, you will also want a ![]() Fortitude Tonic to clear the weakening.
Fortitude Tonic to clear the weakening.
The ideal state to be in before entering the shadow pit is level 9, near a level up to 10 - but usually that isn't possible. Make sure you are ready before heading in! Once you are in, you need to pick a boss to kill - depending on your build, this might depend on who you encounter early since the layout is random. The easiest for most builds is usually Wanton Shadow, which has high damage but low HP and pretty fine abilities. You can use a level up catapult if near level 10.
After that, you'll want to head straight to the Dark Beneath (it's wherever the boss you killed was) and start regen fighting her - try to regen exactly enough HP to take a hit between each attack, and don't hit her while bleeding or you'll get exhausted. Once you start to run out of blackspace, you should pivot to fighting another shadow. Most builds find the Festering Shadow pretty easy to regen fight, but it does give you weakening which can be a problem.
Continue doing this, you will probably need to either kill 3 or 4 shadows here (probably 3 if you prepped ![]() Can of Whupaz or are a
Can of Whupaz or are a ![]() Rogue or both, probably 4 for caster classes).
Rogue or both, probably 4 for caster classes).
Bosses
Festering Shadow: Attack: 56 Health: 565 25% physical resist Corrosive Weakening blow
Wanton Shadow: Attack: 123 Health: 297 25% resists Corrosive
Eternal Shadow: Attack: 75 Health: 476 25% physical resist Weakening blow Corrosive Undead Bloodless Death Protection - 6 layers
Envious Shadow: Attack: 93 Health: 386 50% physical resist 100% deathgaze Corrosive
The Dark Beneath: (This is the only mandatory boss, but you have to kill at least one of the optional bosses before fighting it) Attack: 75 Health: max hp of 1, but overhealed to 3174 Serrated strike Trophy: Eclipse stone (+30% resists but -30% bonus damage, when you attack the effect switches to +20% bonus damage and +2 fireball damage per level, on fireball switches back)
Quests
Magical Mystery Tour, part 1: Win with a Priest and earn Ding! Max (reach level 10). (Rewards 3333 gold and unlocks the disintegration wand prep from the Blacksmith, which can be used to blow up a wall and damage adjacent enemies)
★★★★★★★★★★
★★
I recommend either playing an ![]() Orc Priest, a
Orc Priest, a ![]() Halfling Priest or a
Halfling Priest or a ![]() Human Priest. I went with Human. Orc is the strongest for the main dungeon, Halfling is the strongest for the shadows, and Human is the strongest for the Dark Beneath.
Human Priest. I went with Human. Orc is the strongest for the main dungeon, Halfling is the strongest for the shadows, and Human is the strongest for the Dark Beneath.
For preps, more attack booster(s), ![]() Perseverance Badge,
Perseverance Badge, ![]() Compression Seal, quest items, black market,
Compression Seal, quest items, black market, ![]() Amulet of Yendor or
Amulet of Yendor or ![]() Balanced Dagger, burn+fortitude+whupazz+health potions, either conjunction or
Balanced Dagger, burn+fortitude+whupazz+health potions, either conjunction or ![]() Jehora Jeheyu depending on your feelings about inventory management and other gods.
Jehora Jeheyu depending on your feelings about inventory management and other gods.
A great god to worship here is JJ - ![]() Chaos Form helps you reach level 10 and it removes
Chaos Form helps you reach level 10 and it removes ![]() Weakened and
Weakened and ![]() Corrosion. Additionally, you get so much piety for him by the end that you can use
Corrosion. Additionally, you get so much piety for him by the end that you can use ![]() Last Chance with 100 piety for a guaranteed refill.
Last Chance with 100 piety for a guaranteed refill.
Once you get to level 9, you can descend to the pit. Nothing special here - it's the same general strategy except Eternal Shadow and Wanton Shadow are both significantly easier for ![]() Priest thanks to Good Health and Good Golly, so I recommend doing them as your first 2 shadows (probably start with Eternal if you can because the blackspace helps with the
Priest thanks to Good Health and Good Golly, so I recommend doing them as your first 2 shadows (probably start with Eternal if you can because the blackspace helps with the ![]() Death Protections).
Death Protections).


